Green Grading Coffee
| Origin
Table of Contents
A major aspect of purchasing coffee is performing a physical inspection of the coffee. Roasters should inspect every sample sent by an importer according to industry standard green grading standards. Then, once the green coffee has arrived at the roastery, it’s important to inspect the coffee again, following the same green grading principles. When something goes wrong and the coffee in your hands doesn’t meet the contracted standards, it is essential to have the objective assessment that physical inspections and green grading provide while negotiating with your suppliers.
Read on for an overview of the protocols and some practical applications and modifications that some roasters might consider.
Representative Sample
The first step in your physical inspection is analyzing a representative sample of coffee. Generally, these representative samples are prepared by importers, warehouses, and exporters when you receive samples for purchase approval. SCA and CQI protocols for green coffee inspection require at least 350 grams of coffee.
If you are pulling samples from your green inventory, the best practice is to take samples from a variety of bags – to ensure the sample being analyzed represents the entire lot. The protocol requires samples from multiple locations from at least 10% of the bags in a lot. For example, if you’re receiving a container of 280 bags, you should sample from 28 bags. For smaller orders, you should pull samples from at least 10 bags.
For many roasters, your lots may be even smaller, so just be sure to pull a small sample from each bag. If your coffee is shipped in grain pro or vacuum packs, you will probably adjust this protocol so you don’t damage these bags. Instead, you can pull a sample from only one bag and then maintain the integrity of the other bags.
Physical Inspection
The goal of physical inspections is to ensure the coffees arriving in your roasting plant match the characteristics of the coffees you approved and the agreed upon quality expectations. For this reason, you should review a report of the inspection from the original purchase sample as a reference to the current arrival.
Measuring the physical characteristics of your coffee includes taking density and moisture readings. To measure moisture, you need a specialized moisture meter. The moisture meter will measure the average moisture content of your coffee sample as a percentage of the total weight. The standard allowable moisture content, according to the SCA, is 10-12%.
Generally, any reading above 12% would be not acceptable and could significantly lose cupping points within 3 months. The coffee may be more susceptible to mold or other issues. Moisture content that is too low could indicate that the coffee was over-dried or stored improperly. Coffees with moisture content less than 10% may show premature signs of age if not properly dried, but sometimes a minor loss of moisture is acceptable.
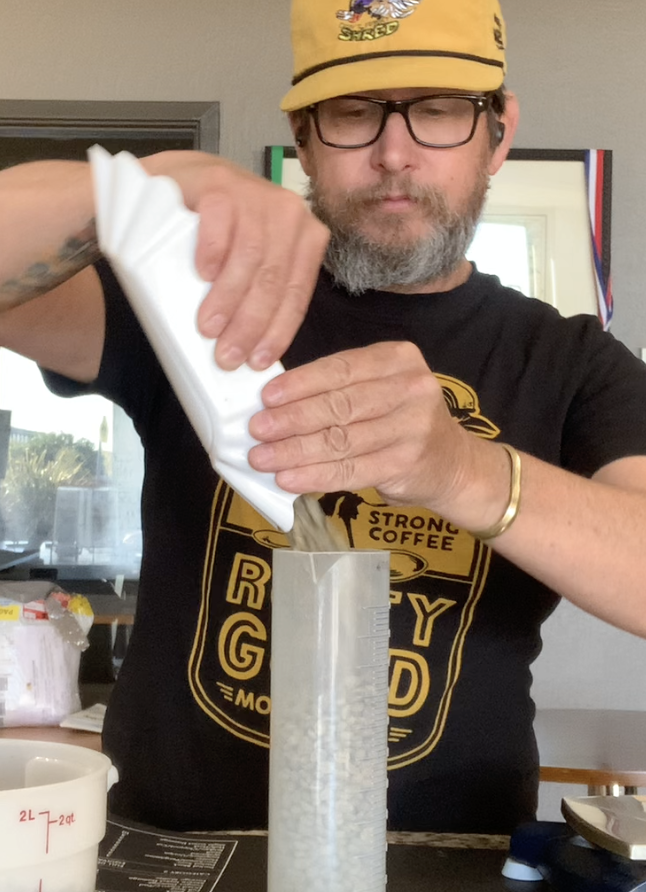
The protocols to measure the bulk density of coffees are simple and don’t require specialized equipment beyond a simple graduated cylinder and accurate scale (though many moisture meters have a feature for measuring density). Bulk density is calculated as weight / volume (grams per milliliter or kilograms per hectoliter).
To measure density, free-pour green coffee into a graduated cylinder of known volume. Fill the cylinder to the top, and level it with a straight edge. Weigh the coffee.
Example:
Fill a 1000ml graduated cylinder with 690 grams of coffee
690 / 1000 = .69
The bulk density of this sample is 0.69 g:ml.
This measurement can inform your roasting (which is a deep topic we will address in future blog posts), but also as a measurement for the stability of your coffee. In the absence of a moisture meter (which might be prohibitively expensive for many smaller roasters or those starting out), comparing the density of the same coffee lot over time provides a very rough indication about how the coffee is aging. If the storage conditions are optimal, then the coffee’s density shouldn’t change. If density decreases, then the coffee is losing moisture or other compounds. If the density increases, then your coffee may be absorbing moisture from the environment.
Green Grading
Green grading is an essential aspect of coffee’s physical inspection. The full protocols are outlined in the Specialty Coffee Association’s (SCA) Washed Arabica Green Coffee Defect Guide. This document and standard was specifically developed for washed arabica coffee, but is a useful resource for evaluating the condition of your green beans no matter the processing method – you may just need to be more forgiving of natural and other processing methods or non-arabica coffees.
The protocol requires 350 grams of coffee, which you assess the color and smell, and then sort by hand, against a matte black placemat under full spectrum lighting (4000k, 1200 Lux), pulling out any of the defects identified in the handbook.
The handbook provides photos of each defect, and a detailed description of the possible causes, the impact on the cup, and other important information. It is a protocol that takes time and training. Even without a trained Q Grader, it’s important to take this physical look at your coffee. When a sample arrives and it differs significantly from the coffee you approved, a simple photo of the defects is helpful to share with your supplier to discuss the issue.
The following table lists each defect and shows how many beans (from your 350g sample) you need to find before recording that as a defect. For example, one full black bean = 1 category 1 defect; but you’re allowed 3 partial black beans before counting those beans against the sample.
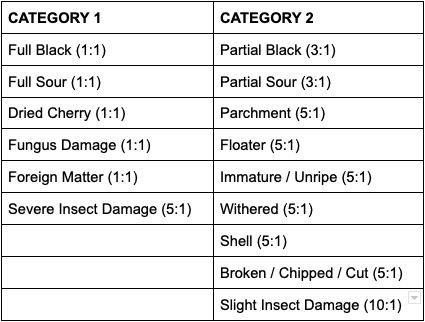
Note that the defects are organized as primary and secondary defects, with those issues that are more likely to cause objectionable flavors in the cup listed further up on the list. For this reason, if you find a bean with two defects (e.g. broken, chipped, cut and also showing signs of partial black, you would categorize the defect as the more severe issue (partial black in the above example), and not penalize it for the lesser defect (broken, chipped, cut).
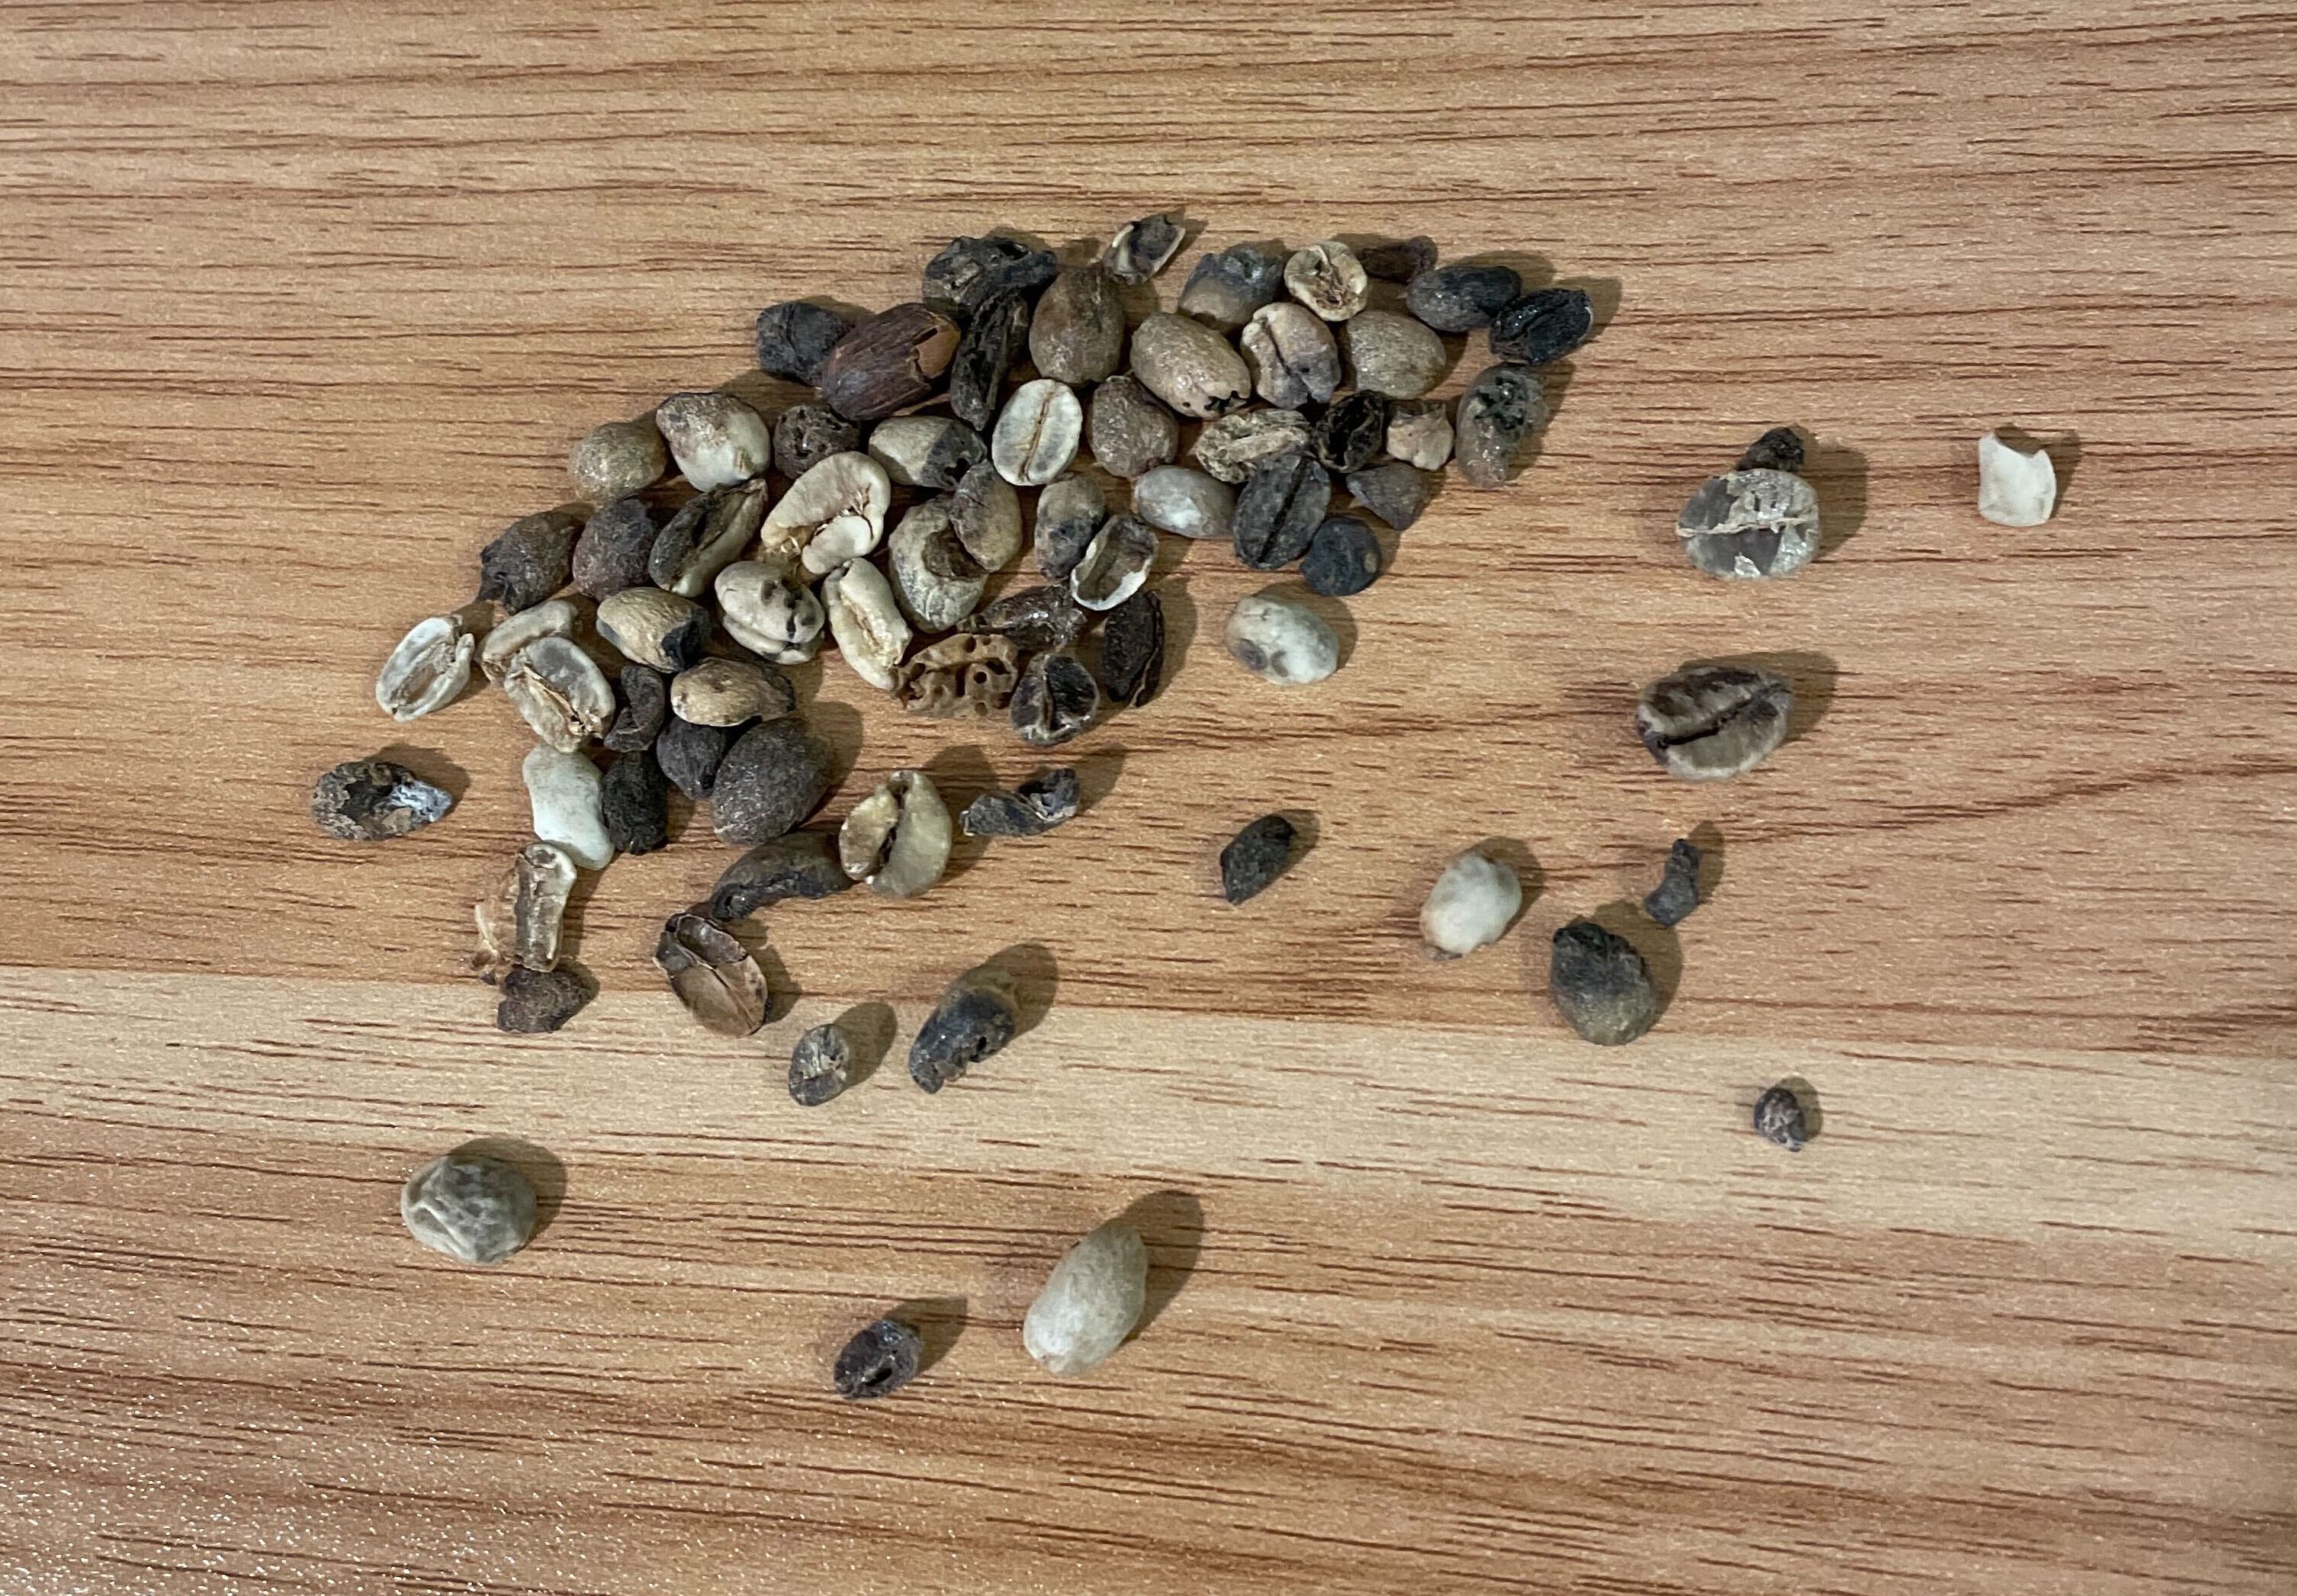
In order to technically qualify as “specialty coffee” there should be no Category 1 defects and no more than 5 category two defects in your 350 gram sample.
There are often situations where you cannot complete the entire protocol, and as a roaster, it’s important to take an efficient approach to green grading. Perhaps the most common situation is a supplier that sends a sample size smaller than 350 grams recommended in the protocol. If you only have 100 grams of coffee, you should still carefully assess the sample for defects, and can multiply the resulting defective beans by 3.5 in order to apply a similar defect count. While this isn’t a perfect solution, since it assumes all defects will appear at the same rate in a larger sample, it’s a compromise worth making.
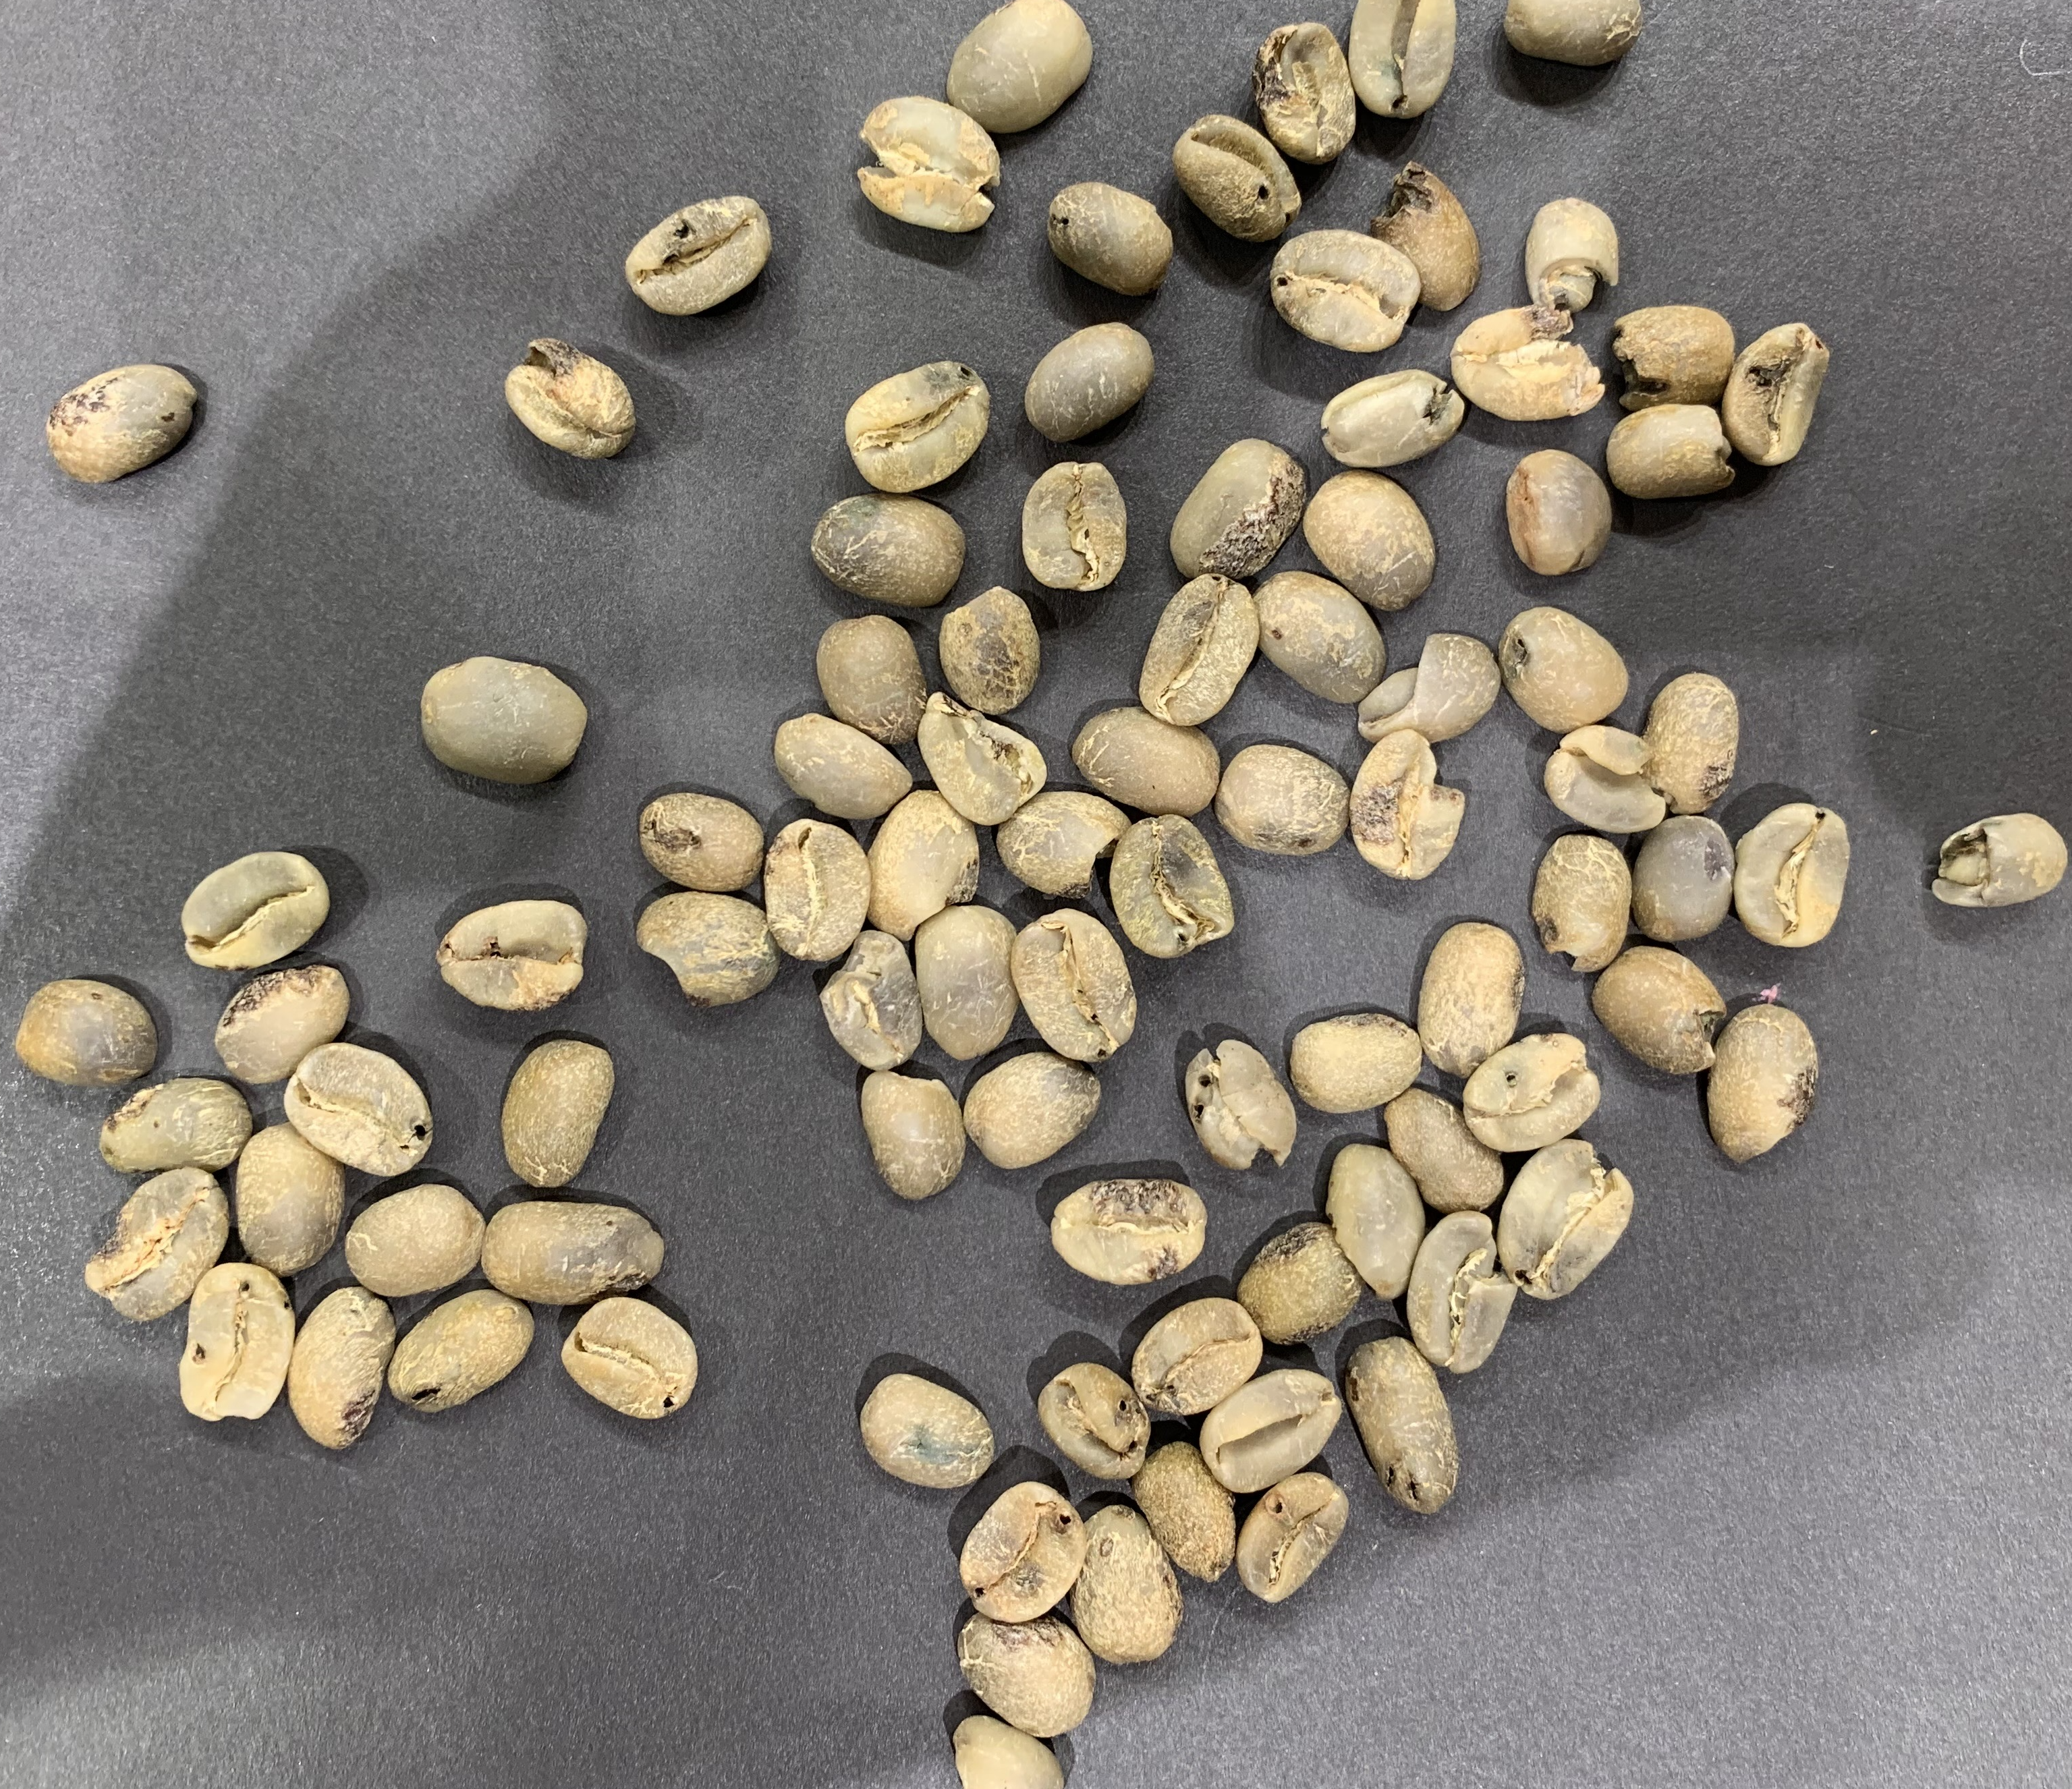
Representative defects from a 350g sample with severe and slight insect damage, broken beans, and other issues.
It’s equally important to be mindful of the time and effort it takes to assess green coffee. Carefully sorting and reviewing a 350 gram sample can easily take 20-30 minutes even for an experienced Q grader. If you have 6 samples to grade, that could easily take you 3 hours! For example, you’re looking for a new Nicaraguan coffee. You contact several importers and request samples that meet your requirements, and a week later you have six coffees to assess. You should absolutely look at each coffee carefully, but as soon as you find major defects in a sample, record them, and move on to the next sample to save time. In this specific scenario, it isn’t necessary to count everything, because I have other samples which may be cleaner to move on to.
It’s also essential to recognize that the green grading protocols and allowances for defects described above were developed for a very specific type of coffee – washed arabica. You should still assess samples of naturals, honeys, and wet hulled coffees for defects, and I would also carefully assess other species like robusta, eugenoidies, and liberica. Coffees that haven’t gone through the washed process have fewer sorting steps and may have a higher incidence of defects, so, generally, I am more forgiving of these coffees than I would be for a washed sample.
After completing your physical inspection, be sure to note them and share the results with your supplier. Contact your supplier for resolution if there are discrepancies between samples and arrivals or if there are serious issues with a sample.
Prior to sample roasting, you should add the defects back to your sample and prepare to roast it for the sensory inspection.
Physical Inspection and Green Grading in Cropster
Cropster makes it easy to record your physical inspection and green grading results. With the ability to record coffee grades to samples and green inventory, Cropster makes it simple to manage your quality control efforts for a variety of coffees, and to compare offer samples to arrivals, green inventory from the warehouse to your roastery.
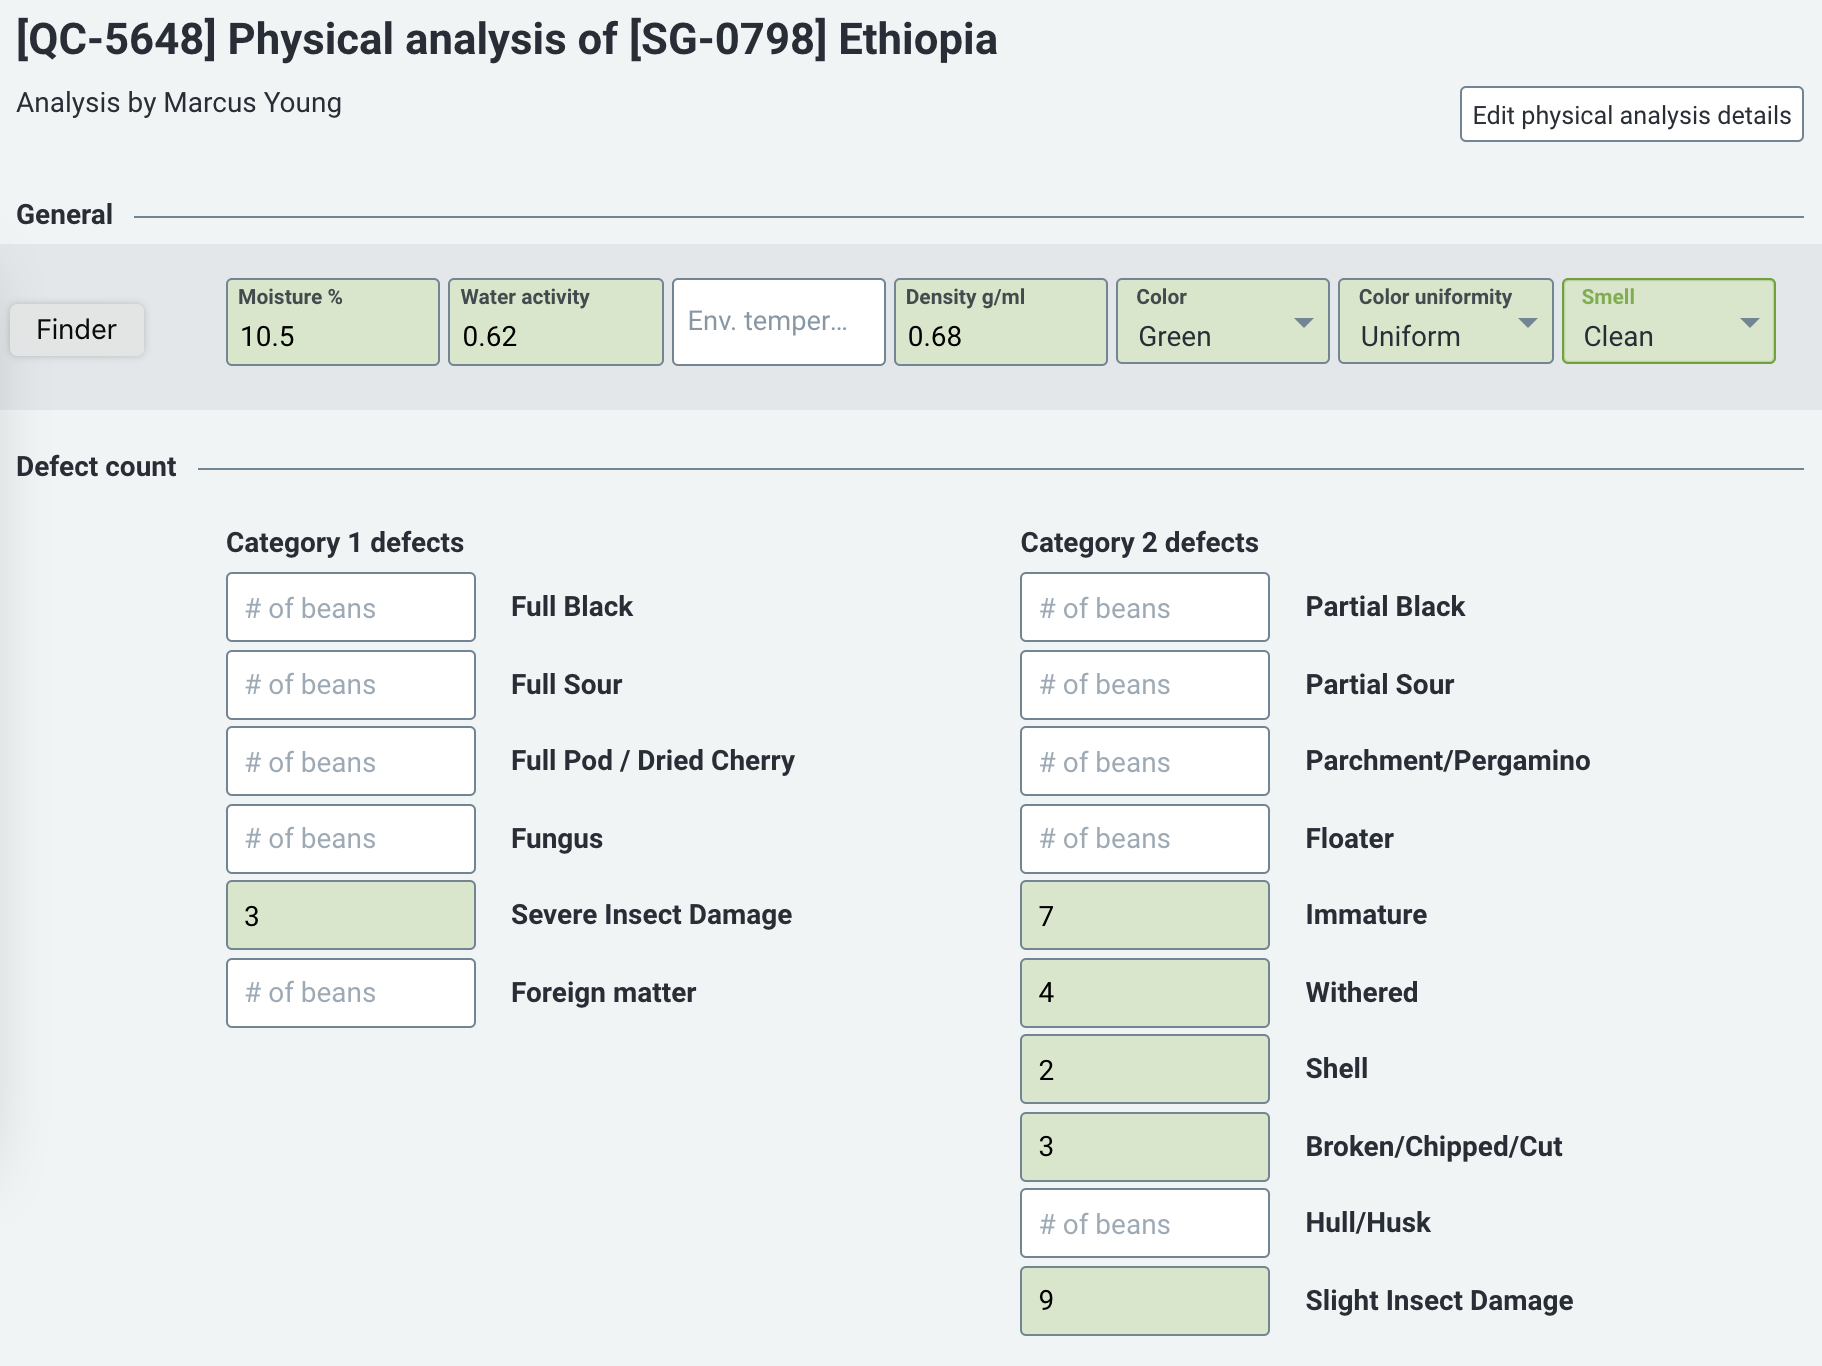
Green grading and physical analysis in Cropster.
With Crospter’s robust reporting features, it’s easy to share the results of your green inspection with your supply network. As just one element of quality control within Cropster, it also links your green grading results to sensory analysis.
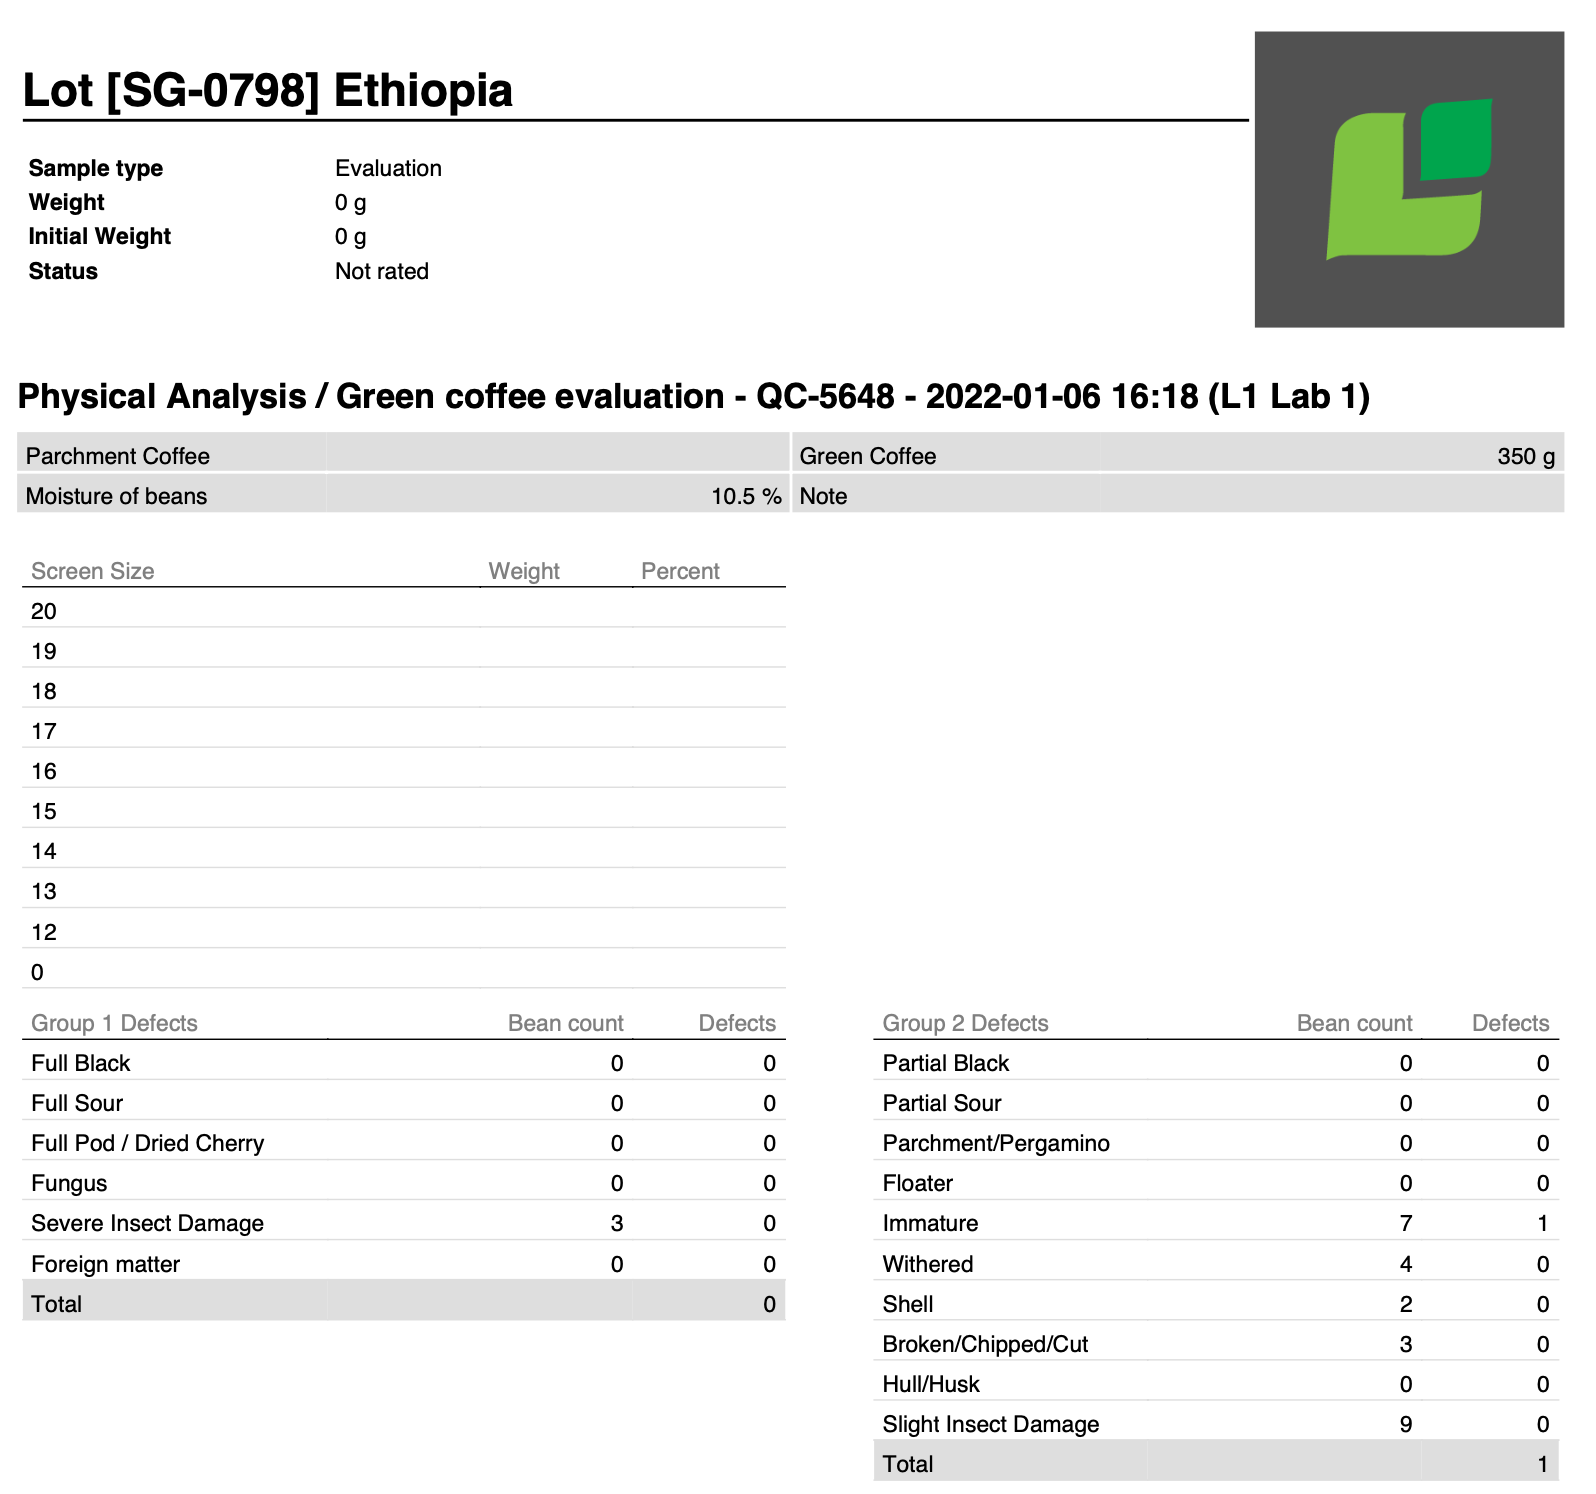
Physical quality report including green grading in Cropster.
Having all the information about your coffee housed in a central location helps green buyers, quality control staff, and roasters understand the relationship between green defect counts, moisture, density, and other measurable physical attributes to the sensory quality of coffees and the way the coffee behaves in the roaster.
Green coffee quality is the cornerstone of any roasting business. Taking the time to understand the physical characteristics is an important aspect of quality management, consistency, and assuring the coffees that arrive in your roastery meet the contracted specifications of the coffees you purchase.
